It’s been a while since the last GPIO Zero release, so it’s with great pleasure I announce v1.4 is here. Upgrade now on your Raspberry Pi:
sudo apt update
sudo apt install python-gpiozero python3-gpiozero
Or on your PC:
pip install gpiozero
Why on your PC?
- Run Python code on your PC to remotely control a Raspberry Pi
- Use a handy command-line tool to see the Raspberry Pi’s pinout
- Use the mock pin interface to test your code
So what’s new?
In summary:
- Improved remote GPIO support
- Remote hardware SPI is now possible
- Abstraction of Pin classes – we now provide pin factories
- New simple syntax for hot-swapping between pin libraries and different remote Pis
- Support for the Pi Hut’s upcoming STATUS and STATUS Zero boards (designed by Rachel Rayns)
- New pinout command-line tool
- Improved documentation
- As well as API docs, we provide beginner recipes and advanced recipes
- Added remote GPIO remote configuration including PC/Mac/Linux and Pi Zero OTG, and a section of GPIO recipes
- New sections on source/values, command-line tools, FAQs, Pi information and library development
- Better organised documentation
Read on for details!
Pin factories and remote GPIO
Up to v1.0, everything was built directly on top of the RPi.GPIO library. Then in v1.1, my co-author Dave created a pin class abstraction which allowed us to implement pin interaction in any given library, so people could select a pin library to be used, and we added support for RPIO and Dave even wrote a pure Python one called NativePin. In v1.2 we added support for the pigpio library, which allows remote connections. This meant you could use GPIO Zero to control one Raspberry Pi’s pins from another, or even install GPIO Zero on a PC and control a Pi’s pins remotely.
History
Remote GPIO Support in v1.2 was sketchy. It improved in v1.3, but in v1.4 we have come up with a much neater mechanism for selecting and re-selecting pin libraries, and we’ve stabilised the API. We’ve also introduced documentation for configuring remote GPIO on Windows, Mac, Linux and Raspberry Pi, and added a section for recipes specifically showcasing remote GPIO use cases.
New pin factory syntax
Previously, there were two methods of selecting a pin library to use: by setting environment variables, or by using Pin objects in the code. Both of these methods have changed:
- Environment variables no longer require you specify the pin class name, just the library name in lowercase:
- Old:
GPIOZERO_PIN_FACTORY=PiGPIOPin - New:
GPIOZERO_PIN_FACTORY=pigpio
- Old:
- Pin factories are now used rather than pin objects:
- Old:
from gpiozero import LED
from gpiozero.pins.pigpiod import PiGPIOPin
led = LED(PiGPIOPin(17, host='192.168.1.5'))
- New:
from gpiozero import LED
from gpiozero.pins.pigpio import PiGPIOFactory
factory = PiGPIOFactory(host='192.168.1.5')
led = LED(17, pin_factory=factory)
- Old:
While this example is one extra line, it does make it easier in many more cases, and when you’re using a class which doesn’t take a pin parameter, like a HAT with pre-defined pin numbers, you couldn’t previously change the pin library in the constructor. Now you can:
from gpiozero import LED
from gpiozero.pins.pigpio import PiGPIOFactory

factory2 = PiGPIOFactory(host='192.168.1.2')
factory3 = PiGPIOFactory(host='192.168.1.3')

local_hat = TrafficHat()
remote_hat2 = TrafficHat(pin_factory=factory2)
remote_hat3 = TrafficHat(pin_factory=factory3)
The flow for a device electing a pin factory is as follows:
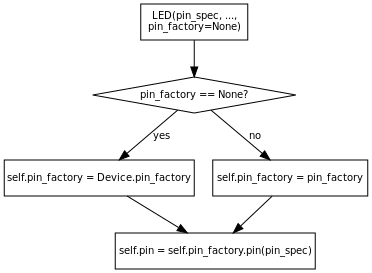
Read more in the pins API documentation.
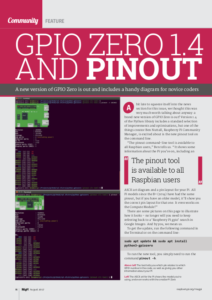
This opens up a lot of possibilities. Check out the remote recipes for some inspiration (and feel free to suggest some more!). I’m now going to be shouting much more about remote pins – it could be a real game changer. I wrote an article in The MagPi #60 introducing people to remote GPIO. You can buy or download the full issue, or read this article this PDF from the magazine

Mock pin
Another pin factory we provide is called mock. Dave created this to make it possible to test the GPIO Zero code base with a test suite. It just uses MockPin to simulate pins going high and low and having mock device objects reacting to each other as they should. It’s also handy for testing your code out without using a Raspberry Pi, or if you don’t have all the components you need handy. Simply launch a Python shell or editor with mock as your pin factory, and you can test that it behaves as it should:
$ GPIOZERO_PIN_FACTORY=mock python3
>>> from gpiozero import LED
>>> led = LED(22)
>>> led.blink()
>>> led.value
True
>>> led.value
False
You can even tell pins to change state (e.g. to simulate a button being pressed) by accessing an object’s pin property:
>>> from gpiozero import LED
>>> led = LED(22)
>>> button = Button(23)
>>> led.source = button.values
>>> led.value
False
>>> button.pin.drive_low()
>>> led.value
True
pinout command-line tool
There’s a pi_info function in GPIO Zero we use to determine which Pi model you’re on to give appropriate warnings when you’re trying to do stuff on, say, pins that don’t exist on your Pi. I suggested we add some pretty-print for the output of this function, particularly the pin header layout, and one thing led to another, Dave created ASCII art to show the Pi along with the information. A guy named Steward Adcock joined our sprint table at PyConUK last year and asked if there was something easy he could dip into. I suggested producing a command-line tool for pinout and he helped get it started. Et voila:
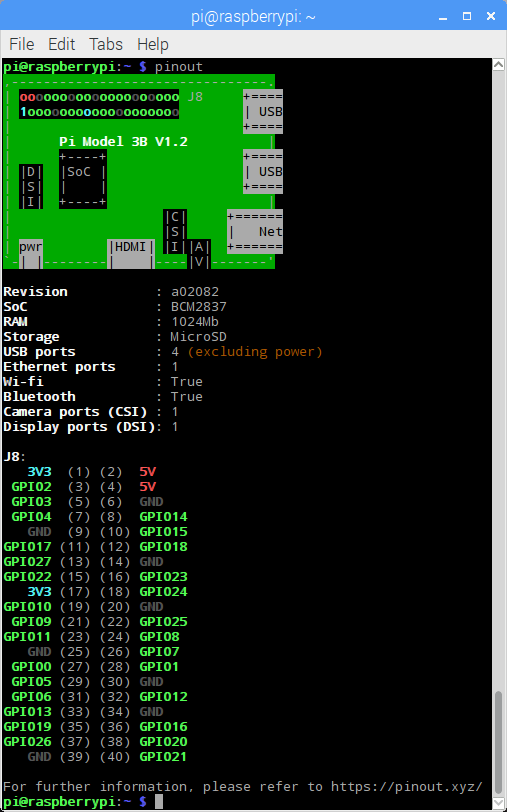 It works on any Pi model, and gives you the correct pinout for the Pi you’re on. Run it on your Pi:
$ pinout
You can even use it on your PC – just use an environment variable to use MockPin, and (optionally) provide a Pi revision (otherwise the default is a Pi 3):
$ GPIOZERO_PIN_FACTORY=mock pinout -r 9000c1
The great thing about pinout is that anyone can use it – regardless of whether they’re using GPIO Zero or Python, it’s just a stand-alone tool. Again, this was featured in The MagPi #60:
STATUS
Rachel designed two boards for The Pi Hut, which go on sale soon: STATUS, and STATUS Zero. They’re general purpose status indicators you can use for all sorts of projects.
STATUS is a HAT-sized board with five strips, each containing a red/green LED pair, and a button. There’s also a label space on the strip for you to write in what it’s monitoring. STATUS Zero is similar, but Zero-sized, and just contains three strips (without buttons). See an early prototype of the Zero.
Here’s an example using our internal device PingServer to show who’s home, based on pinging IP addresses of known devices:
from gpiozero import PingServer, StatusZero
from gpiozero.tools import negated

status = StatusZero('mum', 'dad', 'alice')

statuses = {
    PingServer('192.168.1.5'): status.mum,
    PingServer('192.168.1.6'): status.dad,
    PingServer('192.168.1.7'): status.alice,
}

for server, leds in statuses.items():
    leds.green.source = server.values
    leds.green.source_delay = 60
    leds.red.source = negated(leds.green.values)
This was really easy to implement, as our LEDBoard class can be constructed with nested LEDBoards, which can (optionally) be given names. An example implementation of a similar two-strip board would be:
strip = LEDBoard(
    one=LEDBoard(red=14, green=15),
    two=LEDBoard(red=17, green=18),
)
More examples of LEDBoard use are now included in the advanced recipes page.
Source/values
This is nothing new – but we added a source/values documentation page, explaining how the feature works and how you can use it in your projects. A quick recap:
led.source = button.values
This is a simple approach to connecting devices together using a declarative style of programming. In one line, we declare that the LED should get its values from the button: i.e. when the button is pressed, the LED should be on. Rather than write a while loop, constantly checking the button state and setting the LED state, we just tell one to follow the other. We also provide a set of source tools for applying common operators to process values in between devices, and show how you can write your own tools.
Since the last release, Martin O’Hanlon created a zero-boilerplate Python library for allowing users to control things on their Raspberry Pi remotely using their Android device: it’s called BlueDot. The API is very similar to GPIO Zero, and it even incorporates the value/values properties, which means you can hook it up to GPIO devices easily:
from bluedot import BlueDot
from gpiozero import LED

bd = BlueDot()
led = LED(17)

led.source = bd.values
i.e. the LED is lit when the blue dot is pressed
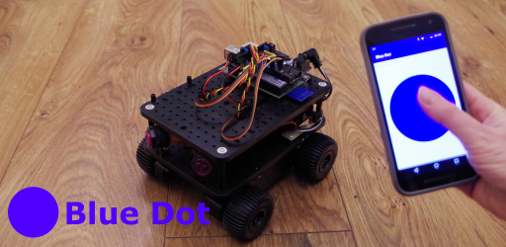
We even included a couple of BlueDot examples in our recipes.
What’s next?
In v1.5 we’re looking to add support for more GPIO devices, but particularly to introduce I2C support which will give us access to a lot more devices, and provide a seamless step-up from simple GPIO to more advanced projects using I2C sensors and such, without having to learn a new low-level library, just sticking with the nice high-level GPIO Zero API. This will also allow us to utilise the pin factory concept with I2C expander chips, meaning you’ll easily be able to add more GPIO pins to your Pi. We also plan to add support for SPI output devices and a wider variety of motors and robots.
We have plenty more on the roadmap, there are plenty of issues to work through, and some of it will be later rather than sooner, so I can’t be certain what will make the next release, but we will keep working on it and hopefully I’ll have some great new stuff to write about for v1.5.
Thanks as always to Dave Jones for the great effort he’s put into the library. Thanks also to Steward Adcock for contributing towards the pinout command-line tool.